Kia Soul EV: ESP(Electronic Stability Program) System / Yaw-rate and Lateral G Sensor Repair procedures
Kia Soul EV (PS EV) 2015-2020 Service Manual / Brake System / ESP(Electronic Stability Program) System / Yaw-rate and Lateral G Sensor Repair procedures
| Removal |
| 1. |
Remove the ignition key from the vehicle. |
| 2. |
Disconnect the battery negative cable and wait for at least three minutes before beginning to work. |
| 3. |
Disconnect the DAB, PAB, SAB, CAB and BPT connectors. |
| 4. |
Remove the floor console.
(Refer to Body - "Floor console") |
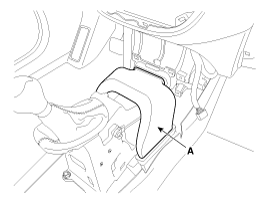
| 5. |
Remove the rear heating joint duct (A).
|
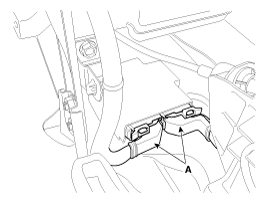
| 6. |
Pull up the lock of the SRSCM connector and disconnect the connector (A).
|
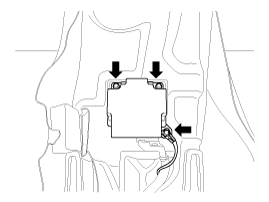
| 7. |
Remove the SRSCM mounting bolts(3EA) from the SRSCM, then remove the SRSCM.
|
| Installation |
| 1. |
Remove the ignition key from the vehicle. |
| 2. |
Disconnect the battery negative cable and wait for at least three minutes before beginning to work. |
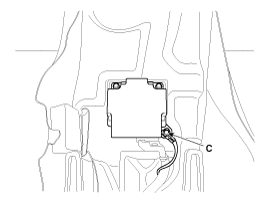
| 3. |
Install the SRSCM with the SRSCM mounting bolts.
|

| 4. |
Connect the SRSCM harness connector. |
| 5. |
Install the rear heating joint duct. |
| 6. |
Install the floor console.
(Refer to Body - "Floor console") |
| 7. |
Reconnect the battery negative cable. |
| 8. |
After installing the SRSCM, confirm proper system operation:
|
|

| G-Sensor Calibration |
| 1. |
Turn ignition "OFF" and connect GDS. |
| 2. |
While ignition "ON" & engine "OFF", select vehicle name and ESC system. |
| 3. |
Perform G-sensor calibration. |
| 4. |
Perform the "G-Sensor Calibration" procedure with GDS.
|
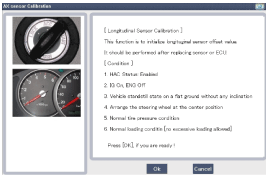
| 5. |
Complete the "G-Sensor Calibration" procedure. |
 Yaw-rate and Lateral G Sensor Description and Operation
Description
The yaw rate and G sensor is included inside the air bag control module (SRSCM).
When the vehicle is turning with respect to a vertical axis
the yaw rate sensor detects the yaw rate ...
 ESP OFF Switch Description and Operation
Description
1.
The ESP OFF switch is used by users to turn off the ESP system.
2.
The ESP OFF lamp is on when ESP OFF switch is engaged.
...
Other information:
Kia Soul EV (PS EV) 2015-2020 Service Manual: Quick Charge Specifications
Specification Output 100kWDC 500V, 200A50kWDC 450V, 110A ...
Kia Soul EV (PS EV) 2015-2020 Service Manual: Refrigerant Direction Control Valve Repair procedures
Inspection 1. Vcc2. Ground Check the voltage between terminals 6 and 7. 1. Using the tester, check the resistance between terminals 1 and 2. TemperatureResistance [K?]°C°F-30-228.7~9.5-25-138.92~9.74-20-49.14~9.98-1559.37~10.23-10149.59~10.47-5239.81~10.7103210.03~10.9554110.25~11.191 ...
Copyright © www.ksoulev.com 2020-2025
