Kia Soul EV: Front Suspension System / Front Lower Arm Repair procedures
Kia Soul EV (PS EV) 2015-2020 Service Manual / Suspension System / Front Suspension System / Front Lower Arm Repair procedures
| Replacement |
| 1. |
Loosen the wheel nuts slightly.
Raise the vehicle, and make sure it is securely supported. |
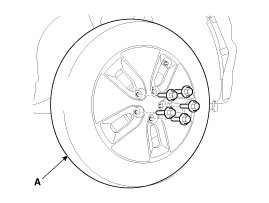
| 2. |
Remove the front wheel and tire (A) from front hub.
|

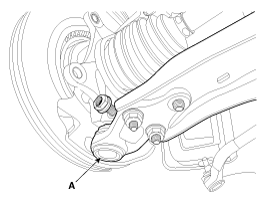
| 3. |
Remove the lower arm (A) from the knuckle.
|
| 4. |
Loosen the bolts (B,C), and then remove the front lower arm (A).
|

| 5. |
Installation is the reverse of removal. |
| Inspection |
| 1. |
Check the bushing for wear and deterioration. |
| 2. |
Check the front stabilizer bar for deformation. |
| 3. |
Check the all bolts and nuts. |
 Front Strut Assembly Repair procedures
Replacement
1.
Loosen the wheel nuts slightly.
Raise the vehicle, and make sure it is securely supported.
2.
Remove the front wheel and tire (A) from front hub.
Tightening torque:
...
 Front Stabilizer Bar Repair procedures
Replacement
1.
Loosen the wheel nuts slightly.
Raise the vehicle, and make sure it is securely supported.
2.
Loosen the bolt (A) and then disconnect the universal joint assembly from the pin ...
Other information:
Kia Soul EV (PS EV) 2015-2020 Service Manual: Specifications
Specifications Front Suspension ItemSpecificationSuspension typeMacPherson StrutShock absorber TypeGasCoil springFree Height [I.D. color]327.9mm (12.9842 in.) [Violet - Yellow] Rear Suspension ItemSpecificationSuspension typeTorsion Beam AxleShock absorber TypeGas (Mono tube)Coil s ...
Kia Soul EV (PS EV) 2015-2020 Service Manual: Auto Defogging Actuator Repair procedures
Inspection 1. Turn the ignition switch OFF. 2. Disconnect the negative (-) battery terminal. 3. Verify that the auto defogging actuator operates to the open position when 12V is connected to terminal 3 and ground to terminal 4. Verify that the auto defogging actuator operates to the c ...
Copyright © www.ksoulev.com 2020-2025
