Kia Soul EV: Heater / Auto Defogging Actuator Repair procedures
Kia Soul EV (PS EV) 2015-2020 Service Manual / Heating,Ventilation, Air Conditioning / Heater / Auto Defogging Actuator Repair procedures
| Inspection |
| 1. |
Turn the ignition switch OFF. |
| 2. |
Disconnect the negative (-) battery terminal. |
| 3. |
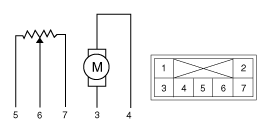
Verify that the auto defogging actuator operates to the open
position when 12V is connected to terminal 3 and ground to terminal 4.
Verify that the auto defogging actuator operates to the close position when connected in reverse. |
| 4. |
Connect the auto defogging actuator connector. |
| 5. |
Turn the ignition switch ON. |
| 6. |
Check the voltage between terminals 5 and 6.
Specification
It will feedback the current position of the actuator to controls. | ||||||||||||||||
| 7. |
If the auto defogging actuator does not operate well,
substitute with a known-good auto defogging actuator and check for
proper operation. Use the replaced actuator if it performs well. |
| Replacement |
| 1. |
Disconnect the negative (-) battery terminal. |
| 2. |
Remove the crash pad lower panel.
(Refer to Body - "Crash Pad Lower Panel") |
| 3. |
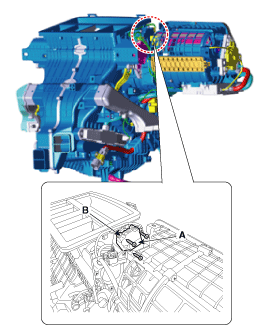
Remove the driver shower duct (A) after loosening the mounting screw.
|
| 4. |
Install in the reverse order of removal. |
 Mode Control Actuator Repair procedures
Inspection
1.
Turn the ignition switch OFF.
2.
Disconnect the mode control actuator connector.
3.
Verify that the mode control actuator operates to the defrost mode when 12V is connected t ...
 Heat Pump
...
Other information:
Kia Soul EV (PS EV) 2015-2020 Service Manual: Components and Components Location
Components 1. Steering column assembly2. Universal joint assembly3. Steering gear box ...
Kia Soul EV (PS EV) 2015-2020 Service Manual: Components and Components Location
Components Location High Voltage Battery System Assembly 1. BMS ECU2. Main Relay 3. Pre Charge Relay4. Pre Charge Resistor5. Battery Current Sensor6. Safety Plug7. Main Fuse8. Battery Temperature Sensor9. Runaway Arresting Device (RAD)10. High Voltage Battery Heater (With heater system)11. ...
Copyright © www.ksoulev.com 2020-2025


