Kia Soul EV: High Voltage Battery Control System / Battery Current Sensor Repair procedures
Kia Soul EV (PS EV) 2015-2020 Service Manual / EV Battery System / High Voltage Battery Control System / Battery Current Sensor Repair procedures
| Inspection |
| 1. |
Turn the ignition switch OFF. |
| 2. |
Shut off the high voltage.
(Refer to Battery Control System - "High Voltage Shut-off Prcedure") |
| 3. |
Remove the high voltage battery system assembly.
(Refer to High Voltage Battery System - Repair procedures - "Removal") |
| 4. |
Remove the high voltage battery pack upper case.
(Refer to High Voltage Battery System - Case - "Upper Case") |
| 5. |
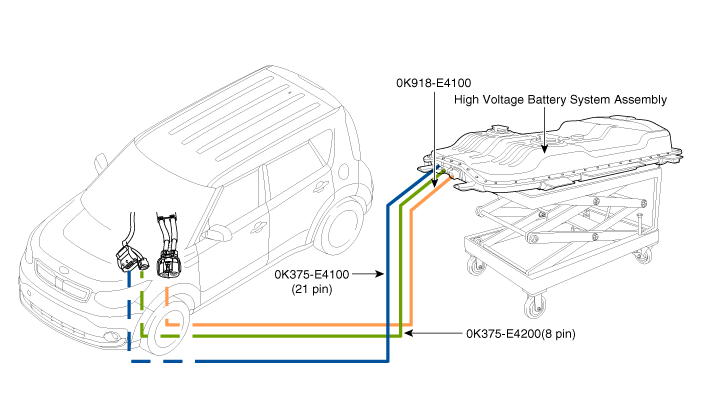
Connect the SST (No: 0K918-E4100, 0K375-E4100, 0K375-E4200) to the vehicle as shown in the image below.
|
| 6. |
Connect the GDS to DLC. |
| 7. |
Turn the ignition switch ON. |
| 8. |
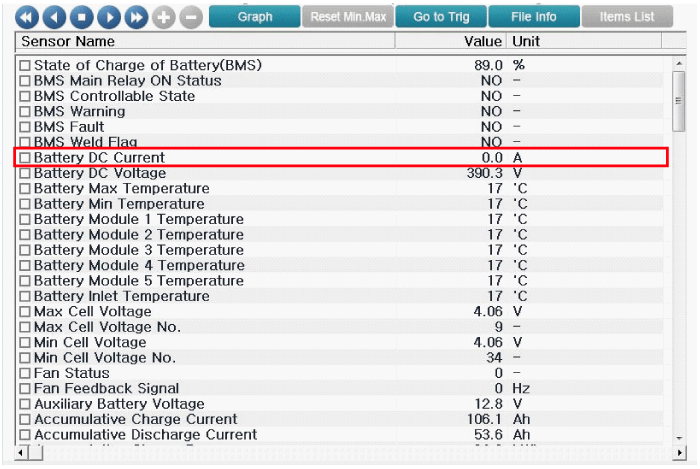
Check the "Battery Pack Current" in the GDS service data.
|
| 9. |
Check voltage for each current.
|
| 10. |
Measure the voltage between pins No. 12 (Sensor output) and No. 26 (Sensor ground) of BMS ECU E connector.
|
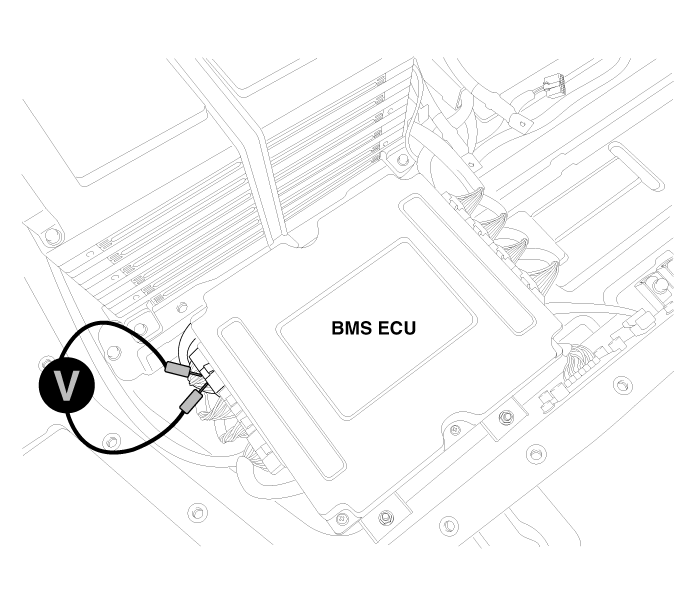
| 11. |
Measure the voltage between pins No. 1 (Sensor power) and No. 26 (Sensor ground) of BMS ECU E connector.
|
| Removal |
Main Relay, Pre Charge Relay, Pre Charge Resistor, Battery
Current Sensor, High Voltage Battery Heater Relay and the High Voltage
Battery Heater Fuse are integrated in the Power Relay Assembly (PRA). So
Refer to the removal procedure of Power Relay Assembly (PRA).
|

| Installation |
Main Relay, Pre Charge Relay, Pre Charge Resistor, Battery
Current Sensor, High Voltage Battery Heater Relay and the High Voltage
Battery Heater Fuse are integrated in the Power Relay Assembly (PRA). So
Refer to the installation procedure of Power Relay Assembly (PRA).
|
 Battery Current Sensor Schematic Diagrams
Systerm Circuit Diagram
With High Voltage Battery Heater System
Without High Voltage Battery Heater System
Circuit Diagram
Without High Voltage Battery Heater System
With High Voltage Bat ...
 Safety Plug Description and Operation
Description
Safety Plug is installed on the bottom of the rear seat. High voltage circuit can be shut off by removing the safety plug.
...
Other information:
Kia Soul EV (PS EV) 2015-2020 Service Manual: Wheel Repair procedures
Hub nut tightening sequence Tighten the hub nuts as follows. Tightening torque: 88.3 ~ 107.9N.m (9.0 ~ 11.0kgf.m, 65.1 ~ 79.6lb-ft) When using an impact gun, final tightening torque should be checked using a torque wrench. Run out inspection 1. Jack up the ...
Kia Soul EV (PS EV) 2015-2020 Service Manual: Rear Door Side Weatherstrip Repair procedures
Replacement 1. Loosen the rear door checker (B) mounting bolt. Tightening torque : 16.7 ~ 21.6 N.m (1.7 ~ 2.2 kgf.m, 12.3 ~ 15.9 lb-ft) 2. Detach the clips, then remove the rear door side weatherstrip (A). 3. Install in the reverse order of removal. ...
Copyright © www.ksoulev.com 2020-2025
