Kia Soul EV: Heater / Temperature Control Actuator Repair procedures
Kia Soul EV (PS EV) 2015-2020 Service Manual / Heating,Ventilation, Air Conditioning / Heater / Temperature Control Actuator Repair procedures
| Inspection |
| 1. |
Turn the ignition switch OFF. |
| 2. |
Disconnect the temperature control actuator connector. |
| 3. |
Verify that the temperature control actuator operates to the
cool position when 12V is connected to terminal 3 and ground to terminal
7.
Verify that the temperature control actuator operates to the warm position when connected in reverse.
|
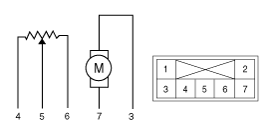
| 4. |
Connect the temperature control actuator connector. |
| 5. |
Turn the ignition switch ON. |
| 6. |
Check the voltage between terminals 5 and 4.
Specification
It will feedback the current position of the actuator to controls. |
| 7. |
If the temperature control actuator does not operate well,
substitute with a known-good temperaturecontrol actuator and check for
proper operation. Use the replaced actuator if it performs well. |
| Replacement |
| 1. |
Disconnect the negative (-) battery terminal. |
| 2. |
Remove the crash pad lower panel.
(Refer to Body - "Crash Pad Lower Panel") |
| 3. |
Remove the driver''s side shower duct (A) after loosening the screw.
|

| 4. |
Disconnect the connector (A) and then remove the temperature control actuator (B) after loosening the mounting screws.
|
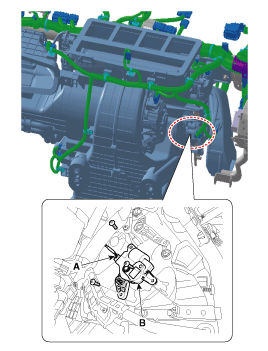
| 5. |
Install in the reverse order of removal. |
 Temperature Control Actuator Description and Operation
Description
The heater unit includes mode control actuator and temperature control actuator.
Located in the heater unit, the temperature control actuator regulates the temperature in the following ...
 Mode Control Actuator Description and Operation
Description
Located in the heater unit, the mode control actuator adjusts
the position of the mode door by operating the mode control actuator
according to the signal from the A/C control unit. ...
Other information:
Kia Soul EV (PS EV) 2015-2020 Service Manual: Rear Bumper Beam Assembly Repair procedures
Replacement • Put on gloves to protect your hands. • When prying with a flat-tip screwdriver, wrap it with protective tape, and apply protective tape around the related parts, to prevent damage. • Us ...
Kia Soul EV (PS EV) 2015-2020 Service Manual: Driver Airbag (DAB) Module and Clock Spring Components and Components Location
Components 1. Driver Airbag (DAB)2. Steering Wheel3. Clock Spring ...
Copyright © www.ksoulev.com 2020-2025
