Kia Soul EV: Tail Gate / Tail Gate Assembly Repair procedures
Kia Soul EV (PS EV) 2015-2020 Service Manual / Body (Interior and Exterior) / Tail Gate / Tail Gate Assembly Repair procedures
| Replacement |
|

|

| 1. |
Remove the tail gate trim.
(Refer to Tail Gate - "Tail Gate Trim") |
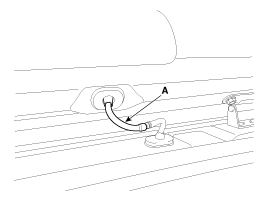
| 2. |
Disconnect the washer nozzle hose (A).
|
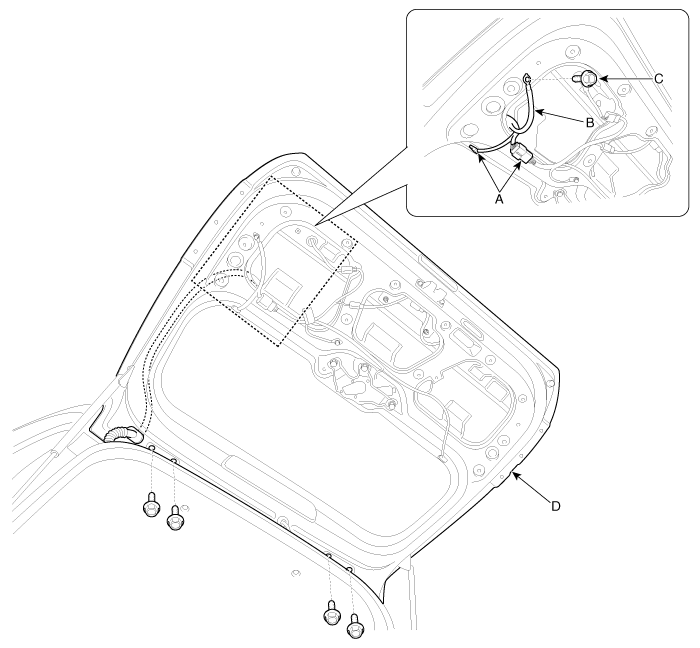
| 3. |
Disconnect the connectors (A) and tail gate wiring harness (B). |
| 4. |
Loosen the ground bolts (C). |
| 5. |
After loosening the mounting bolts, remove the tail gate assembly (D).
|
| 6. |
Using a screwdriver, lift the socket clips (A) up slightly on both ends of the tail gate lifter (B).
|
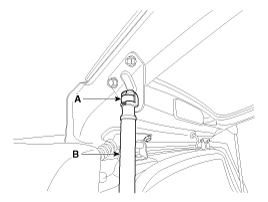
| 7. |
Install in the reverse order of removal.
|
 Tail Gate Assembly Components and Components Location
Component Location
1. Tail gate assembly
...
 Tail Gate Trim Components and Components Location
Component Location
1. Tail gate trim
...
Other information:
Kia Soul EV (PS EV) 2015-2020 Service Manual: High voltage joint box Repair procedures
Removal • Be sure to read and follow the “General Safety Information and Caution” before doing any work related with the high voltage system. Failure to follow the safety instructions may result in serious electrical injuries. • Be sure ...
Kia Soul EV (PS EV) 2015-2020 Service Manual: Refrigerant line Repair procedures
Replacement 1. Discharge refrigerant from refrigeration system. 2. Replace faulty tube or hose. • Cap the open fittings immediately to keep moisture or dirt out of the system. 3. Tighten joint of bolt or nut to specified torque. &nb ...
Copyright © www.ksoulev.com 2020-2025
