Be sure to read and follow the “General Safety Information
and Caution” before doing any work related with the high voltage
system. Failure to follow the safety instructions may result in serious
electrical injuries.
•
Be sure to shut off the high voltage before doing any work
related with the high voltage system(Refer to "High Voltage Shut-off
Procedure"). Failure to follow the safety instructions may result in
serious electrical injuries.
When removing the battery pack assembly to inspect the
battery system, it can be connected to vehicle by using the SST
0K918-E4100, 0K375-E4100, 0K375-E4200.
[Battery Pack Assembly Inspection]
Specification
Method
Countermeasure
Disconnection
-
Visual check
-
Rust
Discolor
Installation status
Leak
DTC about BMS ECU
Refer to DTC guide
Refer to DTC guide
Refer to DTC guide
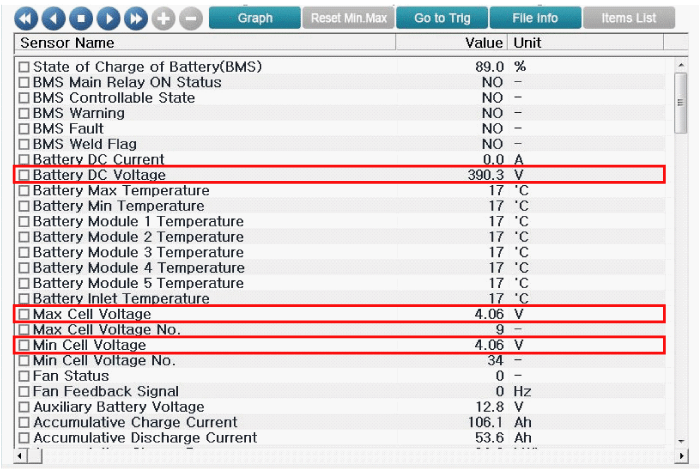
SOC
5% ~ 95%
Check the "Current Data" by GDS
Refer to "SOC level and the countermeasure
Voltage
Cell
2.5 ~ 4.3 V
Check the "Current Data" by GDS
Check the battery voltage sensing circuit (Refer to "Battery voltage sensing circuit")
Pack
240 ~ 413 V
Difference between cells
less than 40mV
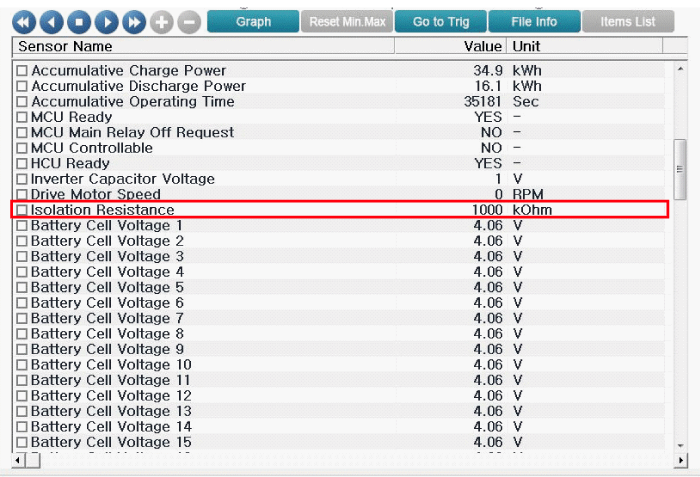
Insulation resistance
300K? ~ 1000K?
Check the "Current Data" by GDS
Refer to "Insulation resistance circuit"
more than 2M?
Using mega ohm tester
more than 2M?
Using mega ohm tester
SOC (State Of Charge) - The percentage of battery charging status
[Visual Inspection]
Item - Electric System, Cooling System, High Voltage Battery Pack Assembly
Problem - Disconnection, Rust, Component status, Oil leak
[SOC Inspection ]
1.
Turn the ignition OFF.
2.
Connect the GDS to DLC.
3.
Turn the ignition ON.
4.
Check the SOC in the GDS service data.
SOC: 5 ~ 95 %
[Battery Voltage Inspection]
1.
Turn the ignition OFF.
2.
Connect the GDS to DLC.
3.
Turn the ignition ON.
4.
Check the Cell Voltage and the Pack Voltage in the GDS service data.
Cell Voltage : 2.5 ~ 4.3 V
Pack Voltage: 240 ~ 413 V
Voltage gap between cells : Less than 40 mV
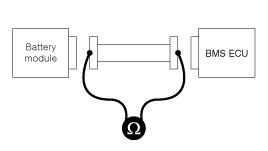
[Voltage sensing circuit Inspection]
1.
Remove the high voltage battery pack assembly.
(Refer to High Voltage Battery System - "Battery Pack Assembly")
2.
Remove the wiring harness of the voltage & temperature sensor.
(Refer to High Voltage Battery System - Repair procedures -
Disassembly - "Wiring harness of the voltage & temperature sensor")
3.
Perform the current test of battery module and the BMS ECU connector.
Specified value : Less than 1? (20°C)
4.
Install the BMS ECU to lower case.
5.
Install the wiring harness of voltage & temperature sensor to BMS ECU.
6.
Measure the insulation resistance between the battery module harness and the lower case.
Specifed value : More than 1M? (20°C)
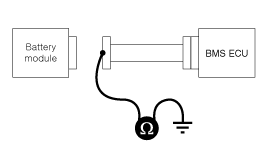
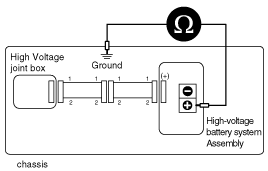
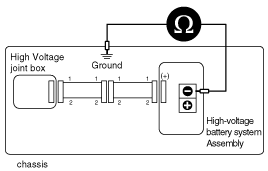
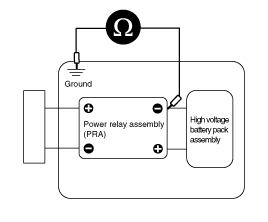
[Insulation Resistance Inspection (With vehicle)]
The insulation status between the vehicle and the battery pack assembly can be checked by GDS or measuring the resistance.
[GDS - Service data]
1.
Turn the ignition switch OFF.
2.
Connect the GDS to DLC.
3.
Turn the ignition switch ON.
4.
Inspect the insulation resistance in the GDS service data.
Specified value : 300k? ~ 1000k?
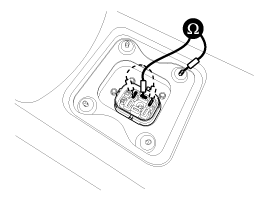
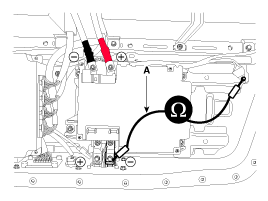
[By using the Mega Ohm Tester]
1.
Shut off the high voltage.
(Refer to Battery Control System - "High Voltage Shout-off Procedure")
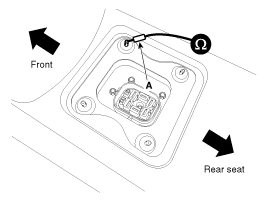
2.
Connect the negative (-) terminal of mega ohm meter (A) to ground of the vehicle.
For precise measuring, connect the negative (-) terminal to the parts not painted.
3.
After connecting the positive (+) terminal to positive (+) terminal of the battery, measure the resistance as follows.
[Insulation resistance of positive (+) terminal of the battery pack assembly
(1)
Supply 500V voltage through mega ohm meter and then wait for about 1 minute to measure the stable resistance value.
(2)
Check the resistance.
Specified value : More than 2M? (20°C)
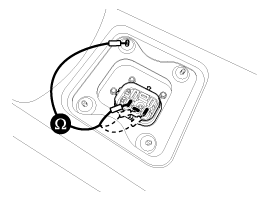
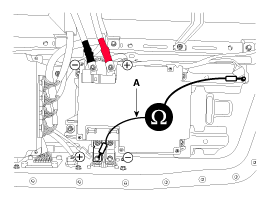
4.
After connecting the positive (+) terminal to negative (-) terminal of the battery, measure the resistance as follows.
[Insulation resistance of negative (-) terminal of the battery pack assembly]
(1)
Supply 500V voltage through mega ohm meter and then wait for about 1 minute to measure the stable resistance value.
(2)
Check the resistance.
Specified value : More than Specified value : More than 2M? (20°C)
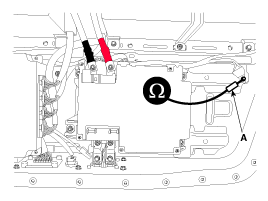
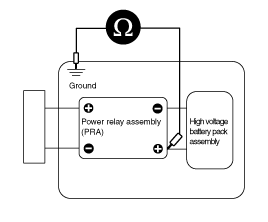
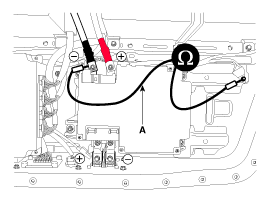
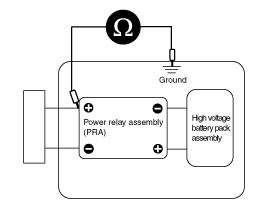
[Insulation Resistance Inspection (With battery)]
[By using the Mega Ohm Tester]
1.
Remove the high voltage battery pack assembly.
(Refer to High Voltage Battery System - "Battery Pack Assembly")
2.
Remove the upper case of high voltage battery pack assembly.
(Refer to High Voltage Battery System - "Case")
3.
Remove the protect cover (A) of power relay assembly (PRA).
4.
Connect the negative (-) terminal of mega ohm meter to lower case.
For precise measuring, connect the negative (-) terminal to the parts not painted.
5.
Connect the positive (+) terminal to high voltage battery terminals to measure the resistance.
[Insulation resistance of positve (+) terminal of PRA high voltage]
(1)
Connect the positive (+) terminal of mega ohm meter (A) to positive (+) terminal of PRA high voltage.
(2)
Supply 500V voltage through mega ohm meter and then wait for about 1 minute to measure the stable resistance value.
(3)
Check the reistance value.
Specified value : More than 2M? (20°C)
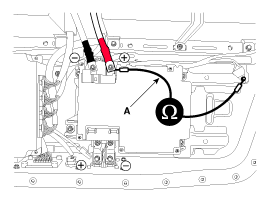
[Insulation resistance of negative (-) terminal of PRA high voltage]
(1)
Connect the positive (+) terminal of mega ohm meter (B) to negative (-) terminal of PRA high voltage.
(2)
Supply 500V voltage through mega ohm meter and then wait for about 1 minute to measure the stable resistance value.
(3)
Check the reistance value.
Specified value : More than 2M? (20°C)
[Insulation resistance of positive (+) terminal of PRA inverter power]
(1)
Connect the positive (+) terminal of mega ohm meter (A) to positive (+) terminal of PRA inverter power.
(2)
Supply 500V voltage through mega ohm meter and then wait for about 1 minute to measure the stable resistance value.
(3)
Check the reistance value.
Specified value : More than 2M? (20°C)
[Insulation resistance of positive (-) terminal of PRA inverter power]
(1)
Connect the positive (+) terminal of mega ohm meter (A) to positive (-) terminal of PRA inverter power.
(2)
Supply 500V voltage through mega ohm meter and then wait for about 1 minute to measure the stable resistance value.
Removal
•
Be sure to read and follow the “General Safety Information
and Caution” before doing any work related with the high voltage
system. Failure t ...
Safety Precaution
Since electric vehicles contain high voltage batteries,
mishandling the high voltage system or vehicle may lead to a serious
accident, including electric shock and electric leakage.
•
Be sure to shut o ...
Replacement
1.
Loosen the wheel nuts slightly.
Raise the vehicle, and make sure it is securely supported.
2.
Remove the front wheel and tire (A) from front hub.
Tightening torque:
88.3 ~ 107.9 N.m (9.0 ~ 11.0 kgf.m, 65.1 ~ 79.6 lb-ft)
Be careful not to da ...


 Schematic Diagrams
 Repair procedures