Kia Soul EV: Power Windows / Power Window Switch Repair procedures
Kia Soul EV (PS EV) 2015-2020 Service Manual / Body Electrical System / Power Windows / Power Window Switch Repair procedures
| Inspection |
Power Window Main Switch Inspection
| 1. |
Disconnect the negative (-) battery terminal. |
| 2. |
Remove the front door trim.
(Refer to Body - "Front Door Trim") |
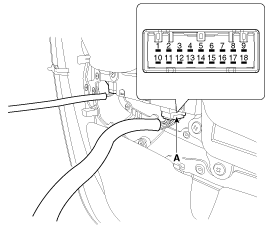
| 3. |
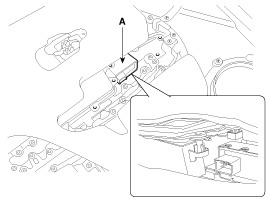
Disconnect the connector (A) from the power window switch module.
|
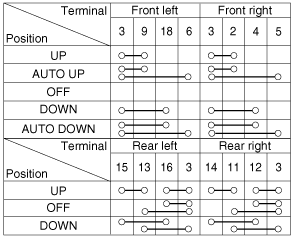
| 4. |
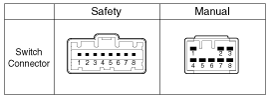
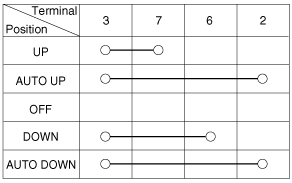
Check for continuity between the terminals in each switch position according to the table.
[Driver/Assist Safety]
[Driver Auto Down]
|
Assist Power Window Switch Inspection
| 1. |
Disconnect the negative (-) battery terminal. |
| 2. |
Remove the front door trim panel.
(Refer to Body - "Front Door Trim") |
| 3. |
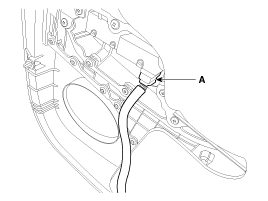
Disconnect the connector (A) from the switch.
|
| 4. |
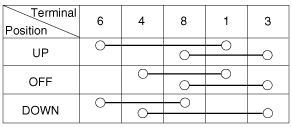
Check for continuity between the terminals in each switch
position according to the table. If the continuity condition is not
normal, replace the switch.
[Safety]
[Manual]
|
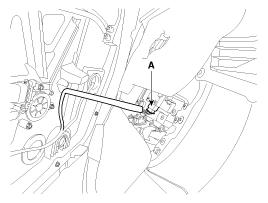
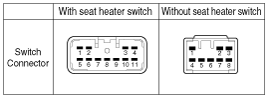
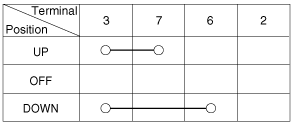
Rear Power Window Switch Inspection
| 1. |
Disconnect the negative (-) battery terminal. |
| 2. |
Remove the rear door trim panel.
(Refer to Body - "Rear Door Trim") |
| 3. |
Disconnect the connector (A) from the switch.
|
| 4. |
Check for continuity between the terminals in each switch
position according to the table. If the continuity condition is not
normal, replace the switch.
[With Seat Heater]
[Without Seat Heater]
|
| Removal |
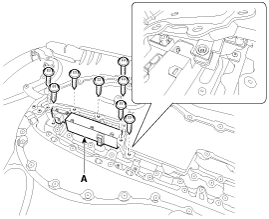
Driver Power Window Switch
| 1. |
Disconnect the negative (-) battery terminal. |
| 2. |
Remove the front door trim.
(Refer to Body - "Front Door Trim") |
| 3. |
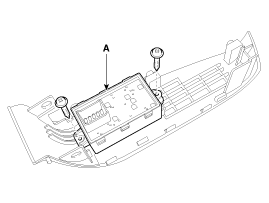
Remove the power window switch assembly (A) by loosening the mounting screws (8EA).
|
| 4. |
Remove the power window switch assembly (A) after loosening the mounting screws.
|
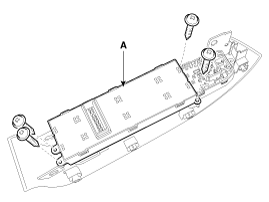
Assist Power Window Switch
| 1. |
Disconnect the negative (-) battery terminal. |
| 2. |
Remove the front door trim.
(Refer to Body - "Front Door Trim") |
| 3. |
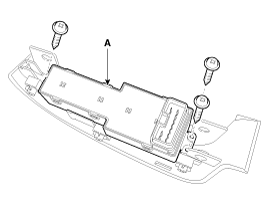
Remove the power window switch assembly (A) by loosening the mounting screws (7EA).
|
| 4. |
Remove the power window switch assembly (A) after loosening the mounting screws.
|
Rear Power Window Swtich
| 1. |
Disconnect the negative (-) battery terminal. |
| 2. |
Remove the rear door trim.
(Refer to Body - "Rear Door Trim") |
| 3. |
Remove the power window switch assembly (A) by loosening the mounting screws (7EA).
|

| 4. |
Remove the power window switch assembly (A) after loosening the mounting screws.
|
| Installation |
Driver Power Window Switch
| 1. |
Install the power window switch assembly. |
| 2. |
Install the front door trim after connecting the connector. |
Assist Power Window Switch
| 1. |
Install the power window switch assembly. |
| 2. |
Install the front door trim after connecting the connector. |
Rear Power Window Swtich
| 1. |
Install the power window switch assembly. |
| 2. |
Install the front door trim after connecting the connector. |
 Power Window Switch Schematic Diagrams
Circuit Diagram
Driver Power Window Switch
Assist Power Window Switch
Rear Power Window Switch
...
 Power Window Relay Repair procedures
Inspection
Diagnosis With GDS
1.
It can quickly diagnose defects of power window by
communicating with GDS. GDS can operate actuator forcefully, monitor
input/output values and self diagnose. ...
Other information:
Kia Soul EV (PS EV) 2015-2020 Service Manual: High Voltage Shut-off Procedures
High Voltage Shut-off Procedure Be sure to read and follow the “General Safety Information and Caution” before doing any work related with the high voltage system. Failure to follow the safety instructions may result in serious electrical injuries. ...
Kia Soul EV (PS EV) 2015-2020 Service Manual: Power Door Mirror Actuator Repair procedures
Inspection 1. Disconnect the negative (-) battery terminal. 2. Remove the front door quadrant cover (A). 3. Disconnect the power door mirror connector (A) from the harness. 4. Apply battery voltage to each terminal as shown in the table and verify that the mirror operates properly. ...
Copyright © www.ksoulev.com 2020-2025
