Kia Soul EV: Windshield Glass / Repair procedures
Kia Soul EV (PS EV) 2015-2020 Service Manual / Body (Interior and Exterior) / Windshield Glass / Repair procedures
| Removal |
|

|

| 1. |
Remove both sides of the front pillar trim.
(Refer to Interior Trim - "Front Pillar Trim") |
| 2. |
Remove both sides of the A pillar garnish.
(Refer to Body Side Moulding- "A Pillar Garnish") |
| 3. |
Remove the cowl top cover.
(Refer to "Cowl Top Cover") |
| 4. |
Remove the inside rear view mirror assembly.
(Refer to Mirror - "Inside Rear View Mirror") |
| 5. |
Remove the LDWS unit.
(Refer to Body Electrical System - "Lane Departure Warning System (LDWS) Unit") |
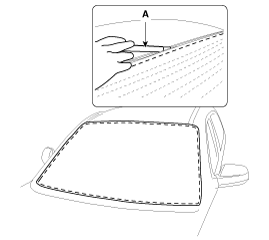
| 6. |
Cut out the adhesive using a utility knife (A).
|

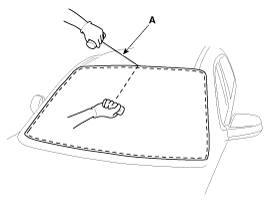
| 7. |
Cut off the sealant on the edge (B) by pulling the piano wire (A) to the left and right.
|
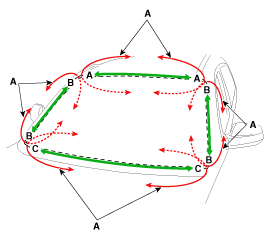
| 8. |
If the piano wire (A) is visible from the chassis, push it into the edges.
|
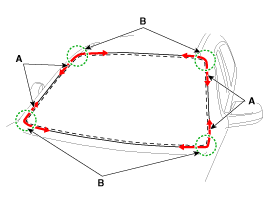
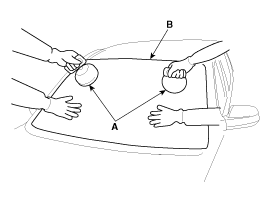
| 9. |
Cut off the sealant on (A-A), (B-B) and (C-C) by pulling the piano wire (A) to the left and right.
|
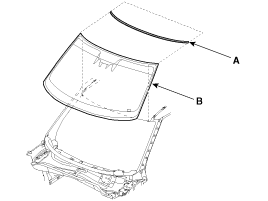
| 10. |
Remove the windshield glass (B) carefully using the glass holder (A).
|
| Installtion |
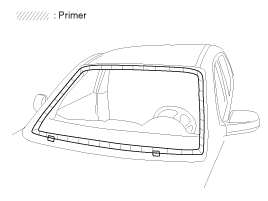
| 1. |
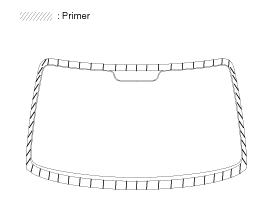
Using a utility knife, scrape off and smooth out old
adhesives to a thickness of about 2mm (0.08 inc.) on the bonding surface
around the entire windshield opening flange:
|
| 2. |
Clean the bonding surface with a sponge dampened in alcohol. After cleaning, keep oil, grease and water away from the surface. |
| 3. |
After installing the spacer (A), temporarily install the
windshield glass (B) by positioning it in the center and place the
alignment mark (C).
|
| 4. |
Peel off the tape from the windshield glass moulding (A) and install the moulding on the windshield glass (B).
|
| 5. |
With a sponge, apply a light coat of body primer to the
original adhesive remaining around the windshield opening flange. Let
the body primer dry for at least 10 minutes.
|
| 6. |
Apply a light coat of glass primer to the outside of the fasteners.
|
| 7. |
Pack adhesive into the cartridge without air pockets to
ensure continuous delivery. Put the cartridge in a caulking gun, and run
a bead of adhesive (B) around the edge of the windshield glass (A)
between the fastener and moulding as shown. Apply the adhesive within 30
minutes after applying the glass primer. Make a slightly thicker bead
at each corner.
|
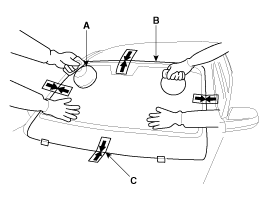
| 8. |
Use suction cups (A) to hold the windshield glass (B) over
the opening, align it with the alignment marks (C) as in step 15, and
set it down on the adhesive. Lightly push on the windshield until its
edges are fully seated on the adhesive all the way around. Do not open
or close the doors until the adhesive is dry..
|
| 9. |
Scrape or wipe the excess adhesive off with a putty knife or
towel. To remove adhesive from a painted surface or the windshield, wipe
with a soft shop towel dampened with alcohol. |
| 10. |
Let the adhesive dry for at least one hour, then spray water
over the roof and check for leaks. If a leak occurs, let it dry, then
seal with sealant :
|
| 11. |
Install the LDWS unit. |
| 12. |
Install the inside rear view mirror assembly. |
| 13. |
Install the cowl top cover. |
| 14. |
Install the A pillar garnish. |
| 15. |
Install the front pillar trim. |
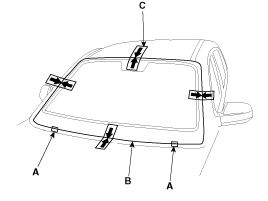
 Components and Components Location
Components
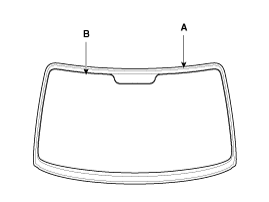
1. Windshield glass 2. Windshield glass moulding
...

Other information:
Kia Soul EV (PS EV) 2015-2020 Service Manual: Seat Heater Switch Components and Components Location
Components [First Row Seat] Connector Pin Information Pin No.Connector AConnector BConnector C1Illumination (+)GroundElectric compressor - interlock (+) 2Sensor REF (+5V)Sensor groundElectric compressor - interlock (-)3C_CAN HighPWM blower INHigh voltage PTC heater - interlock (+)4C_CA ...
Kia Soul EV (PS EV) 2015-2020 Service Manual: Rear Transverse Trim Repair procedures
Replacement • Put on gloves to protect your hands. • When prying with a flat-tip screwdriver, wrap it with protective tape, and apply protective tape around the related parts, to prevent damage. • Us ...
Copyright © www.ksoulev.com 2020-2025
